Setup EC2 Jenkins Slaves with SSH Keys
Setting up a Jenkins slave with SSH key is suppose straight forward, but for whatever reason, Coudbees instruction does not work for Redhat/Centos on AWS EC2 instance. Therefore, I just did it my way and get it working perfectly.
I hope this cheatsheet can help you add a slave quickly in AWS.
Slave server setup
- Setup a Redhat/Centos EC2 instance
- Install all the needed tools, such as Java, maven and etc
- Following is example for installing OpenJDK on Redhat
curl -O http://dl.fedoraproject.org/pub/epel/epel-release-latest-7.noarch.rpm
yum install -y epel-release
yum install -y java-1.8.0-openjdk.x86_64
yum install -y java-1.8.0-openjdk-devel.x86_64
alternatives --install /usr/bin/java java /usr/java/latest/bin/java 200000
alternatives --install /usr/bin/javac javac /usr/java/latest/bin/javac 200000
alternatives --install /usr/bin/jar jar /usr/java/latest/bin/jar 200000
java -version- Enable password login, edit /etc/ssh/sshd_config
sudo vi /etc/ssh/sshd_config- Change "PasswordAuthentication" to yes
#PasswordAuthentication no
PasswordAuthentication yes- Restart sshd
systemctl restart sshd- Create a Linux user call jenkins
sudo useradd -d /var/lib/jenkins jenkins- Set a password for the jenkins user ID
sudo passwd jenkins- AS the user jenkins, create /var/lib/jenkins/.ssh directory
mkdir ~/.ssh
chmod 700 ~/.ssh- Test login to jenkins user from the master server
ssh jenkins@<slaver server IP>
You should be able to login as jenkins on the slave node after entering the password.
Master server
- login to Jenkins master server
- Edit /etc/passwd and change jenkins login with bash shell.
sudo vi /etc/passwd
Change from
jenkins:x:846:861:Jenkins Automation Server:/var/lib/jenkins:/bin/false
To
jenkins:x:846:861:Jenkins Automation Server:/var/lib/jenkins:/bin/bash- Create a .ssh directory for user jenkins
sudo su - jenkins
mkdir .ssh
chmod 700 .ssh- Create SSH Key
ssh-keygen -t rsa- Output is two files
- ~/.ssh/id_rsa --- private key
- ~/.ssh/id_rsa.pub --- public key
- Append Jenkins master's new public key to Jenkins Slave host's ~/.ssh/authroized_keys and ~/.ssh/authroized_keys2
cat ~/.ssh/id_rsa.pub | ssh jenkins@<slave machine IP> 'cat >> .ssh/authorized_keys
cat ~/.ssh/id_rsa.pub | ssh jenkins@<slave machine IP> 'cat >> .ssh/authorized_keys2
Note: For Centos/Redhat7, you need the ~/.ssh/authorized_keys2.
- On the jenkins master server, change the permission of ~/.ssh/authorized.keys and ~/.ssh/authorized.keys2 to 640
ssh jenkins@<slave machine IP> 'chmod 640 ~/.ssh/authorized_keys*'
- New you can try to login from client to remote host without key
ssh jenkins@<slave machine IP>
you should be able to login without entering any password
Jenkins Configuration
- Go to Master node's Jenkins dashboard -> Manage Jenkins ->Manage Nodes.
- Click on new Node
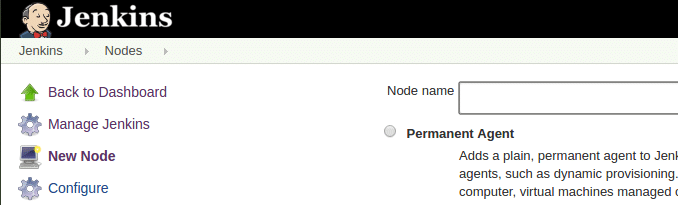
- Enter a name and select "permananet agent" option and click OK

Note: After setting the first slace, another option, “Copy Existing Node” can be select, which is self-explanatory.
- Enter Slave details

- Click on "Add" on for the credentials
select and enter all the credentials as shown below and click ok.
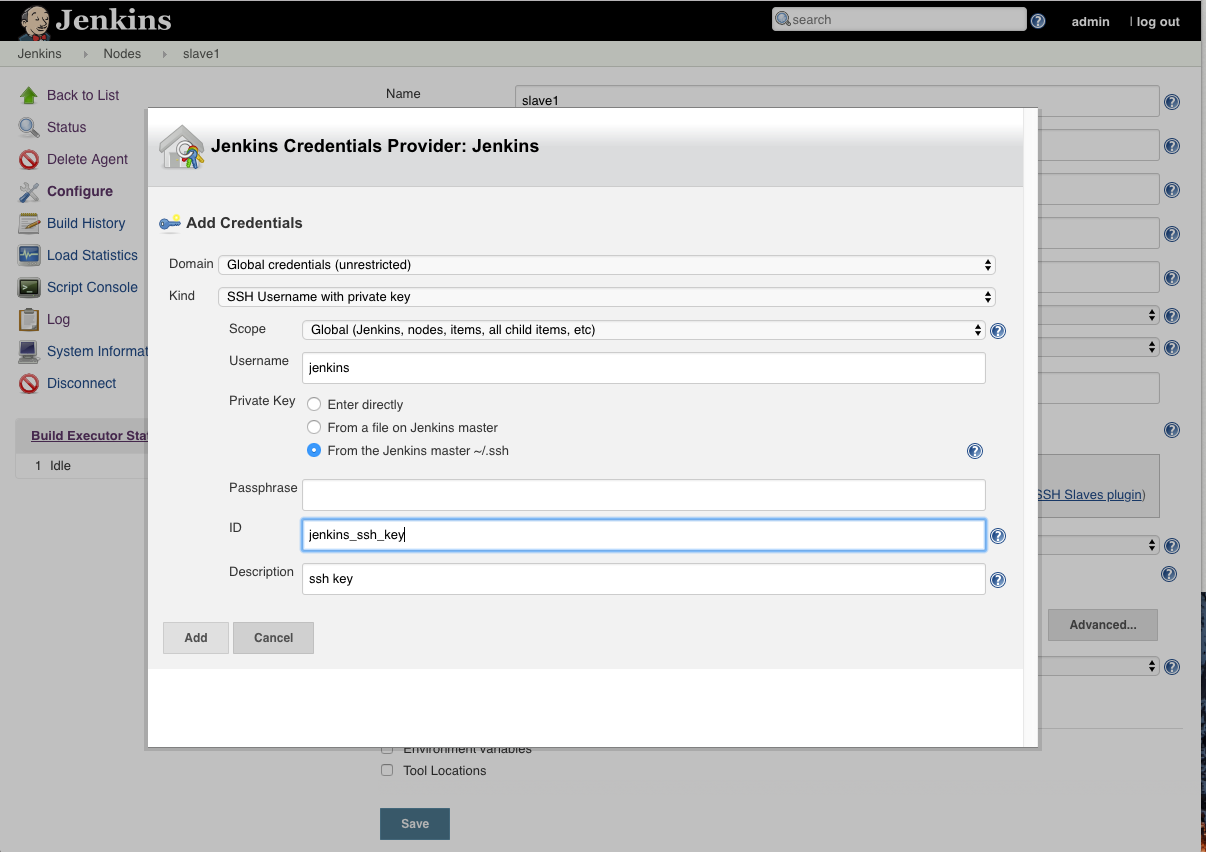
- Select the key
- Click "Save"
- Now you have master and slave machine

Debug slave connection problem
- If you get return like the folliowing

- Click on slave host name
- Click on "See log for more details" to check what went wrong

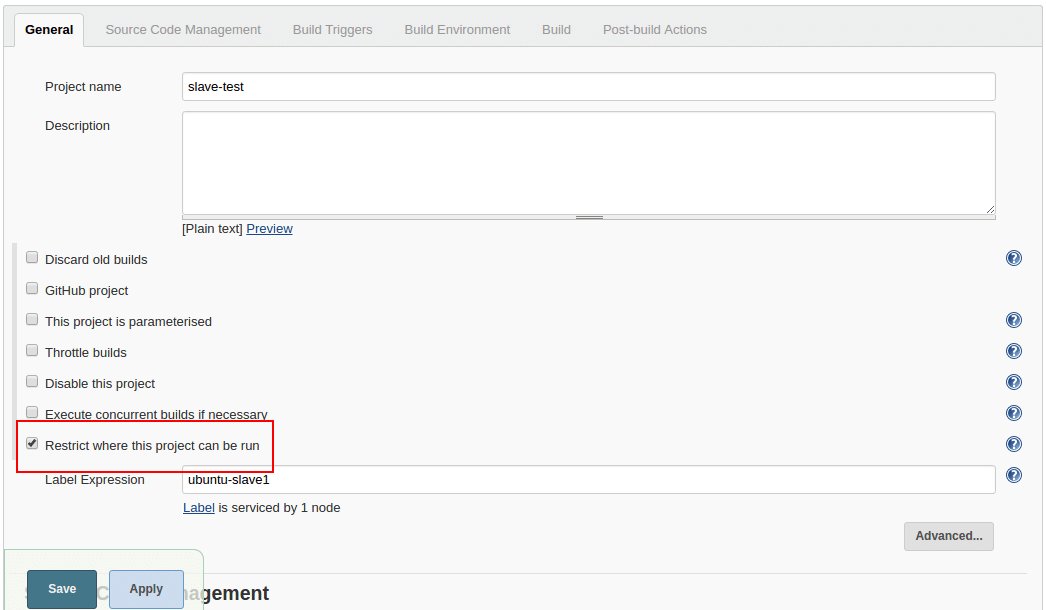
Test the Slave
To test the slave, create a sample project and select the option as shown below. You need to select the node using the label option. If you start to type the letter the node list will show up.
ReplyDeleteIt was great experience after reading this. thanks for sharing such good stuff with us.
DevOps Institute in Delhi
Really Nice Blog, Thank You.
ReplyDeleteDevOps Online Training