Wednesday, March 15, 2017

Rundeck - How to purge job history


1 Introduction

I love Rundeck, it is a open source software that allow me to automate ad-hoc and routine procedures. Rundeck also has access control, workflow building, scheduling, logging, and etc. In summary, it make my life much easier and allow me to delegate routine operation procedures to others by creating a Rundeck job for them.


One thing I find out missing from the Rundeck is a function to purge job history. It does not make sense to keep old job history forever, but somehow, this feature is just not there. So, I decided to create a Rundeck job to allow me to purge old job history.

2 Prerequisites

2.1 Install xmlstartlet on the Rundeck server

We are going to interact Rundeck with REST API with a script, we need to install xmlstartlet to parse xml data return from Rundeck.


Login to the rundeck server and run the following command:

2.2 Change permission to allow job delete with REST API

On the Rundeck server, edit /etc/rundeck/apitoken.aclpolicy file on the rundeck server and add “delete_execution” like the following (in red color)


description: API project level access control
context:
 project: '.*' # all projects
for:
 resource:
- equals:
    kind: job
  allow: [create,delete] # allow create and delete jobs
- equals:
    kind: node
  allow: [read,create,update,refresh] # allow refresh node sources
- equals:
    kind: event
  allow: [read,create] # allow read/create events
 adhoc:
- allow: [read,run,kill] # allow running/killing adhoc jobs and read output
 job:
- allow: [create,read,update,delete,run,kill] # allow create/read/write/delete/run/kill of all jobs
 node:
- allow: [read,run] # allow read/run for all nodes
by:
 group: api_token_group

---

description: API Application level access control
context:
 application: 'rundeck'
for:
 resource:
- equals:
    kind: system
  allow: [read] # allow read of system info
 project:
- match:
    name: '.*'
  allow: [delete_execution,read] # allow view and delete executions of all projects
 storage:
- match:
    path: '(keys|keys/.*)'
  allow: '*' # allow all access to manage stored keys
by:
 group: api_token_group


2.3 Create an authorization token

Look into the file /etc/rundeck/realm.properties to find out the administrator user ID and password


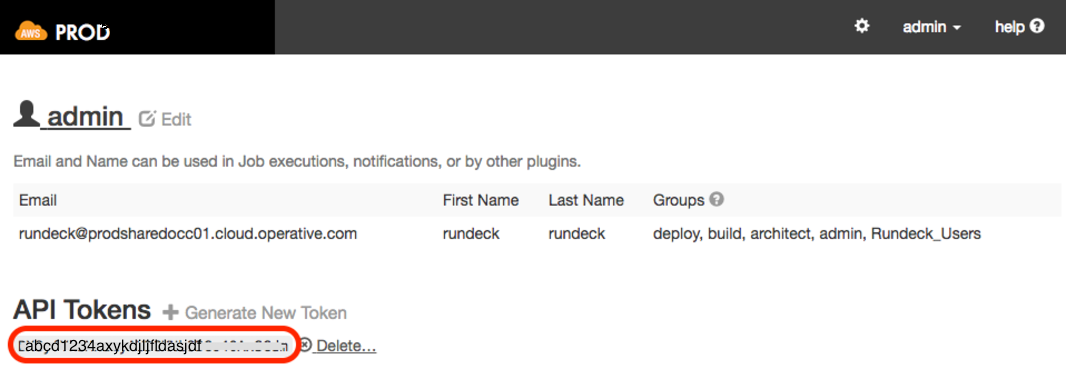
Log in to the Rundeck GUI using the administrator account that has "admin" credentials. Click on the username in the header of the page, and you will be shown your User Profile page. From this page you can manage your API Tokens. Click "Generate API Token" to create a new one. The unique string that is shown is the API Token.


Now, login to the RunDeck server and create a file to store the token value. For example
$ echo “<token you just created>”  >  /var/lib/rundeck/admin_api_token

3 Shell script for purging the Rundeck job history record

Following is the shell script that that can be used to purge job history. You should create a routine Rundeck job to run this shell script.


#!/bin/bash
if [[ $# -ne 2 ]]; then
  echo "Usage:"
  echo "purge_history <retention days> <api tokent file name>"
  exit 1
fi

if [[ -f "$2" ]]; then
  TOKEN=`cat $2`
else
  echo "Can not locate $2"
  exit 1
fi

RETENTION=$1
NODE=localhost


echo "Executing purge_job_history for project ${PROJECT} retention ${RETENTION}"
date

CURL_OUT=/tmp/curl.out.$$

URL="http://${NODE}:4440/api/2/projects"
curl -H "X-RunDeck-Auth-Token:$TOKEN" "Content-Type: application/xml"  -X GET "$URL"  2>/dev/null  > $CURL_OUT

projects=`xmlstarlet sel -t -m "/result/projects/project" -v name -n $CURL_OUT`

purged=0
for PROJECT in $projects
do
  URL="http://${NODE}:4440/api/2/project/${PROJECT}/jobs"
  curl -H "X-RunDeck-Auth-Token:$TOKEN" -o $CURL_OUT -H "Content-Type: application/xml" -X POST "$URL" >/dev/null  2>&1

  for JOB in $(xmlstarlet sel -t -m "/result/jobs/job" -m "@id" -v . -n ${CURL_OUT})
  do
# For each job get the oldest executions
URL="http://${NODE}:4440/api/1/job/${JOB}/executions?offset=${RETENTION}"
curl -H "X-RunDeck-Auth-Token:$TOKEN" -o $CURL_OUT -H "Content-Type: application/xml" -X GET "$URL" >/dev/null 2>&1
for ID in $(xmlstarlet sel -t -m "/result/executions/execution" -m "@id" -v . -n ${CURL_OUT})
do
   URL="http://${NODE}:4440/api/12/executions/delete?ids=${ID}"

   echo "#################################################################"
   echo "Detelet job $URL"

   #echo curl -H "X-RunDeck-Auth-Token:$TOKEN"  -X POST "$URL"  2>&1

   curl -H "X-RunDeck-Auth-Token:$TOKEN"  -X POST "$URL"  2>&1

   purged=$((purged+1))
done
  done
done

echo "Job executions purged:  $purged"


You can test the script by running the following:
$ chmod +x purge_history.sh
$ purge_history.sh 90 /var/lib/rundeck/admin_api_token

Any job history record older than 90 days will be deleted.

4 Reference


Docker on AWS - part 1 getting started

1 Why use containers instead of EC2 instance?

In case you need to convince your management about using containers, following is some good reasons:
  • Ease of deployment - Once the Docket image is built and tested, we will deploy the same image on dev, QA and production environment. It can cut down a lot of efforts on QA testing.
  • Better use of EC2 resource and lowering the cost -
    • Lower overhead - Compared to using EC2 instance, a container only need a small subset of the operating system included in the image. Therefore, a container is much smaller and use less resources.
    • Better utilization of resources - Each EC2 instance is configured with a fixed amount of RAM and CPU, If the resource is not used, it being wasted. If we are able to add and remove as needed, we can better utilize the resource as the shown the following diagram:


  • Changing resource setting on the fly - Amazon EC2 requires to you stop/start the instance when changing the instance type. For containers, the resource limits in containers can be changed on the running instances without restart.


  • Faster Auto Scaling - When auto-scaling need to start a new EC2 instance, it takes couple minutes to boot and pass validation, which it might arrive too late. This force us to use workarounds like scaling up quickly and scaling down slowly. In the contrary, it takes very little time to start a container, therefore we can scale up or scale down in close to real time.

2 AWS service for Docker

2.1 AWS ECS

  • Amazon EC2 Container Service (ECS) is a container's management service that provides an easy way to run and manage run containers (i.e dockers) on a cluster of Amazon EC2 instances based on policies, performance, availability and resource needs of your application.
  • ECS eliminates the need for you to install, operate, and scale your own cluster management infrastructure.
  • There is no charge for the ECS service, AWS only charge you on the EC2 instance usage. For development environment, you can even start with one EC2 instance in the ECS cluster to save on cost.


2.2 AWS ECR

  • Amazon EC2 Container Registry (ECR) is Amazon’s version of a Docker Registry
  • It is integrated with ECS and Docker tool set
  • It use S3 as backend to store your Docker images.
  • The cost is $0.1/GB/month + outgoing traffic
  • Each AWS account can create 10 ECR repository and each repository can hold 50 images


Following is a diagram for visualizing the relationship between ECR and ECS


2.3 AWS ALB

Application Load Balancer (ALB) works as a load balancer and distributes traffic on multiple running containers. ALB is  like a Classic Load Balancer but has many additional features. The most important features for containers are:
  • Container health check - ALB continuously monitors health check of containers, and if any container fails the health check, ALB terminates that container and starts a new one to maintain desired no of containers
  • Dynamic port mapping - ECS can automatic register tasks (containers) with application load balancer with dynamic port number, which means we can easily scale up or down with the number of containers based on a pre-defined policy.
  • Path-based routing – routing based on the request URL


In the following example, it shows different URL path is route to different port number used by the containers. Since there is only one Application Load Balancer, it  simplify the architecture and reducing costs.

2.4 Put it all together

By using ECS, ECR and ALB, we can setup a truly dynamic environment that allow us to scale the application based on the needs as seem in the following diagram


3 Getting started with Docker containers on AWS

3.1 Prerequisites

3.1.1 Understand the ECS terminology

  • ECS - Amazon EC2 Container Service (ECS) is a container management service that supports Docker containers.
  • ECS Cluster -  A logic group of EC2 instances to for running container instance.
  • Container instance - EC2 instance registered as part of an ECS cluster.
  • ECS-Optimized AMI - It is a customized amazon linux AMI used for ECS instance.
  • Task Definition  - Description  on how a docker container should launch. It contains settings like exposed port, docker image, cpu shares, memory requirement, command to run and environmental variables.
  • Scheduler - How place tasks (docker container) to run on the container (EC2) instance
  • Service  -
    • Task Definition  - Description  on how a docker container should launch. It contains settings like exposed port, docker image, cpu shares, memory requirement, command to run and environmental variables.
    • Service description - defines which task(s) used in the service.
  • Task  - A single running instance of task (docker instance) with the settings defined in the Task Definition.
  • Container - A Linux Container (Docker for example) created as part of a task.


The following diagram shows the relationship between different component of ECS


3.1.2 Network

For the networking, there is two ways to for  ECS:
  • Use the ECS wizard to create the VPC, subnet, internet gateway and etc for you.
  • Use your own networking setup, with this, you should already have a VPC with at least two subnetworks, an internet gateway and working route tables.

3.1.3 AMI image for ECS cluster

Amazon provided ECS-Optimized AMI  for ECS cluster. You can find the AMI ID for your region from here.


If there is some reasons you need to use your own AMI, check out this link on how to create a customized AMI for ECS cluster.

3.1.4 Key pair

You need to Create a Key Pair before creating the ECS cluster

3.1.5 IAM roles

  • IAM role for ECS administrator - Your system administrator should have the following roles to administrate ECS and ECR:
    • AmazonEC2ContainerRegistryFullAccess
    • AmazonEC2ContainerServiceFullAccess


  • IAM role for EC2 instance - If you intend to use the Amazon ECS console, the Amazon needed service roles are automatically created for you in the console first run. In case you want to use AWS CLI, complete the procedures in Amazon ECS Container Instance IAM Role and Amazon ECS Service Scheduler IAM Role before launching container instances or using Elastic Load Balancing load balancers with services.

3.2 Getting started with ECS

There are many ways to create an ECS cluster, you can use the AWS console, CloudFormation and AWS CLI. But the easiest way to get start is using the so call “first run” feature on the  


To my surprise, Amazon provides an excellent video and document for setting up your first ECS cluster with the wizard, it will create all the need networking, IAM role for you. All you need is creating a Key Pair before you start.


To get started

  • Follow the instruction in this document  and you will have your first ECS cluster started with a sample application.