1 Introduction
The purpose of this document is introducing a setup for rapid Chef Cookbooks development with Vagrant.
Vagrant is a tool that allow us to create development environment on our desktop. We can use this tool quickly create multiple VM on our desktop and start coding and testing Chef cookbooks.
The following diagram shows the overall Chef cookbook development effort with Vagrant and Chef-solo
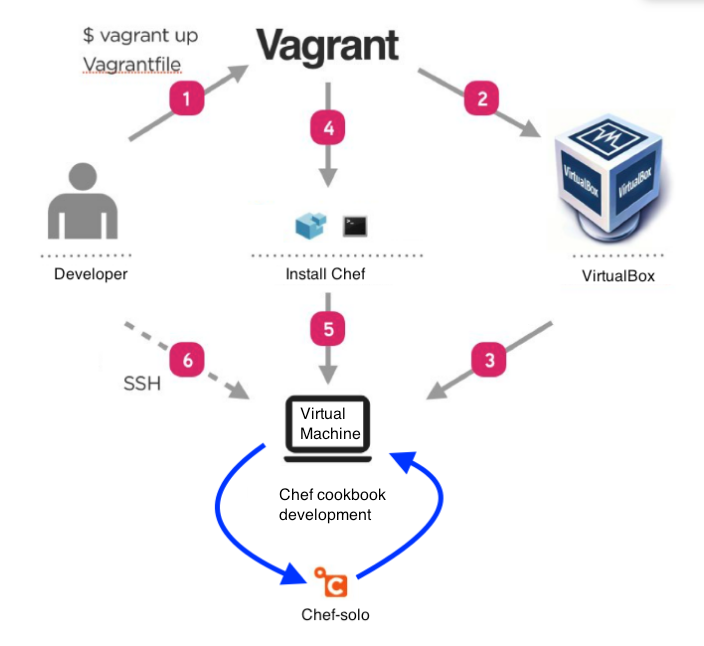
- Developer create a Vagrant configuration file called “Vagrantfile”.
- When developer need a new VM, he/she runs the command “vagrant up”. Vagrant will call VirtualBox
- VirtualBox create a Virtual Machine
- The bootstrap script defined in the VagrantFile will be kickoff by Vagrant
- The bootstrap script install Chef on the VM
- Developer login to the VM to develop and test Chef cookbooks.
2 Create VM with Vagrant and VirtualBox
2.1 Install VirtualBox and Vagrant
First of all, you will need to download and install VirtualBox and Vagrant. This video gives a good introduction on how to install and use Vagrant and VirtualBox.
You can start download and installation with the following links:
2.2 Create VM
2.2.1 Create vagrantfile
A vagrantfile is a configuration file used by the Vagrant on how to install and configure virtual machines.
First, create to a directory to host your vagrant environment, I use ~/lab as example
$ mkdir ~/lab
|
Create a file call vagrantfile
$ cd ~/lab
$ vim vagrantfile
|
Enter the following in the Vagrantfile
# -*- mode: ruby -*-
# vi: set ft=ruby :
# The following define a bootstrap script to be run when the VM starts up
$script = <<SCRIPT
echo "192.168.10.50 server1.example.com" >> /etc/hosts
echo "192.168.10.51 client1.exampl.com" >> /etc/hosts
curl -sSL https://www.opscode.com/chef/install.sh | sudo bash
SCRIPT
# The following define the VM information in an array
servers=[
{
:hostname => "server1",
:ip => "192.168.10.50",
:box => "bento/centos-6.7",
:ram => 1024,
:cpu => 1,
:port_guest => 5601,
:port_host =>5601
},
{
:hostname => "client1",
:ip => "192.168.10.51",
:box => "bento/centos-6.7",
:ram => 1024,
:cpu => 1,
:port_guest => 0,
:port_host => 0
}
]
# vagrant configuration
Vagrant.configure(2) do |config|
servers.each do |machine|
config.vm.define machine[:hostname] do |node|
node.vm.box = machine[:box]
node.vm.hostname = machine[:hostname]
node.vm.network "private_network", ip: machine[:ip]
if machine[:port_guest] != 0
node.vm.network "forwarded_port", guest: machine[:port_guest], host:machine[:port_host]
end
node.vm.provision :shell, inline: $script
node.vm.provider "virtualbox" do |vb|
vb.customize ["modifyvm", :id, "--memory", machine[:ram]]
end
end
end
|
In the above example, it tells vagrants to:
- Create two virtual machines with Centos 6.7 with specific IP address, memory size and number of CPU.
- The first VM has a name called “server1” and the second VM has the name “client1”
- It include a bootstrap script to install chef when the VM starts up
- The port 5061 on the first VM will map to the port 5601 on your desktop
You can change the configuration by editing the vagrant file to fit your need.
2.2.2 Start the virtual machines
To start the virtual machine, cd to the destination folder and run “vagrant up”
$ cd ~/lab
$ vagrant up
|
Once the VMs had been created and running, you can check the status by running “vagrant status”
$ vagrant status
Current machine states:
server1 running (virtualbox)
client1 running (virtualbox)
This environment represents multiple VMs. The VMs are all listed
above with their current state. For more information about a specific
VM, run `vagrant status NAME`.
|
Now, you can ssh to the VM by running “vagrant ssh <vm name>”, for example
$ vagrant ssh server1
Last login: Thu Jan 26 14:24:04 2017 from 10.0.2.2
[vagrant@server1 ~]$
|
3 Chef cookbook development with chef-solo
3.1 Using the /vagrant directory to store Chef repository
The /vagrant directory on the VM is a synced folder. What it means is Vagrant will share your project directory (the directory with the Vagrantfile) to /vagrant on the VM.
By using /vagrant to store the Chef repository, we can destroy the VM and recreate it without worrying losting the work we had done.
3.2 Create a Chef directory structures
After login to your VM, run the following command to create Chef repository called “chefsolo” under the /vagrant directory
$ cd /vagrant
$ wget http://github.com/opscode/chef-repo/tarball/master
$ tar -zxf master $ mv opscode-chef-repo* chefsolo $ rm master |
The chef-repo has the following directory structure
$ tree chefsolo
chefsolo
├── chefignore
├── cookbooks
│ └── README.md
├── data_bags
│ └── README.md
├── environments
│ └── README.md
├── LICENSE
├── README.md
└── roles
└── README.md
|
3.3 Create Chef cookbooks
We want to create the Chef cookbooks now. In this example, I want to create a Chef cookbook called “helloword” for server1 with the following:
$ cd /vagrant/chefsolo/cookbooks
$ tree helloword
helloword
├── attributes
├── files
│ └── default
├── metadata.rb
├── README.md
├── recipes
│ └── default.rb
└── templates
└── default
|
Create bookbook directory, for example helloword in this example:
$ mkdir -p /vagrant/chefsolo/cookbooks/helloword/attributes
$ mkdir -p /vagrant/chefsolo/cookbooks/helloword/files/default
$ mkdir -p /vagrant/chefsolo/cookbooks/helloword/templates/default
|
Edit the file /vagrant/chefsolo/cookbooks/helloword/README.md with the following:
### This cookbook install elastic stack (server1) on a single host
### Installed modules are:
### - Helloworld
### Cookbooks:
- helloword
## Recipes
- helloword::default
|
Create /vagrant/chefsolo/cookbooks/helloword/metadata.rb file
name "helloword"
maintainer "Wayne Yuen"
maintainer_email "wyuen@example.com"
license "All rights reserved"
description "install a simple cookbook"
long_description IO.read(File.join(File.dirname(__FILE__), 'README.md'))
version "0.1.0"
recipe "helloword", "default"
|
Create cookbook recipe /vagrant/chefsolo/cookbooks/helloworld/recipes/default.rb
file "/tmp/helloworld.txt" do
owner "vagrant"
group "vagrant"
mode 00544
action :create
content "Hello, Implementor!"
end'
|
3.4 Create configuration file for chef-solo execution
3.4.1 Create a Chef role file
The following create a role called /vagrant/chefsolo/roles/hello.json
{
"name": "hello",
"default_attributes": {},
"override_attributes": {},
"json_class": "Chef::Role",
"description": "",
"chef_type": "role",
"run_list": [
"recipe[helloword::default]"
]
}
|
3.4.2 Create a solo.rb file
We need to create a file call /vagrant/chefsolo/hello_solo.rb file to tell chef-solo where the chef files located
cookbook_path "/vagrant/chefsolo/cookbooks"
role_path "/vagrant/chefsolo/roles"
data_bag_path "/vagrant/chefsolo/data_bags"
verbose_logging true
environment_path "/vagrant/chefsolo/environments"
environment "dev"
json_attribs "/vagrant/hello_node.json"
|
3.4.3 Create a node json file
We need to create a /vagrant/chefsolo/hello_node.json file to tell chef-solo which Chef role we want to install on the node
{
"name": "localhost",
"automatic": {},
"normal": {},
"chef_type": "node",
"default": {},
"override": {},
"run_list": [
"role[hello]"
]
}
|
3.5 Testing the Chef cookbook with chef-solo
You can test the Chef cookbook by running chef solo on the node
$ sudo chef-solo -c /vagrant/chefsolo/hello_node.json
|
We use the -c option to explicitly tell chef-solo where to read its configuration.
You should see a neat stream of messages from Chef as it works:
$ sudo chef-solo -c /vagrant/chefsolo/hello_node.json
[2013-01-02T17:51:09+00:00] INFO: *** Chef 10.16.4 ***
[2013-01-02T17:51:10+00:00] INFO: Setting the run_list to ["recipe[helloworld]"] from JSON
[2013-01-02T17:51:10+00:00] INFO: Run List is [recipe[helloworld]]
[2013-01-02T17:51:10+00:00] INFO: Run List expands to [helloworld]
[2013-01-02T17:51:10+00:00] INFO: Starting Chef Run for ip-10-203-63-20.ec2.internal
[2013-01-02T17:51:10+00:00] INFO: Running start handlers
[2013-01-02T17:51:10+00:00] INFO: Start handlers complete.
[2013-01-02T17:51:10+00:00] INFO: Processing file[/tmp/helloworld.txt] action create (helloworld::default line 2)
[2013-01-02T17:51:10+00:00] INFO: entered create
[2013-01-02T17:51:10+00:00] INFO: file[/tmp/helloworld.txt] owner changed to 1000
[2013-01-02T17:51:10+00:00] INFO: file[/tmp/helloworld.txt] group changed to 1000
[2013-01-02T17:51:10+00:00] INFO: file[/tmp/helloworld.txt] mode changed to 544
[2013-01-02T17:51:10+00:00] INFO: file[/tmp/helloworld.txt] created file /tmp/helloworld.txt
[2013-01-02T17:51:10+00:00] INFO: Chef Run complete in 0.191596 seconds
[2013-01-02T17:51:10+00:00] INFO: Running report handlers
[2013-01-02T17:51:10+00:00] INFO: Report handlers complete
|
if you run cat /tmp/helloworld.txt you should see a tiny greeting. Success!
3.6 Final Chef cookbooks testing
For a final Chef cookbook testing, you properly want to run Chef on a machine that Chef never had run before. With Vagrant, it is simple, just destroy the VM and re-create it with the following command on your desktop:
$ cd ~/lab
$ vagrant destroy
$ vagrant up
|
After the VM has been re-created, login to the box with
$ vagrant ssh server1
|
And run the “chef-solo” command.
$ sudo chef-solo -c /vagrant/chefsolo/hello_node.json
|
3.7 Push the cookbook to CodeCommit
Now you have complete your Chef cookbook development, you can push the cookbook to a repository, like GIT, from your desktop.
Since the cookbook is stored on the vagrant working directory. It can be access from your VM or desktop. For this example, the share directory is ~/lab/chefsolo/cookbooks
4 Appendix
4.1 Vagrant commands:
You can use Vagrant to provision VM with the following commands:
$ vagrant box manages boxes: installation, removal, etc.
$ vagrant connect connect to a remotely shared Vagrant environment
$ vagrant destroy stops and deletes all traces of the vagrant machine
$ vagrant global-status outputs status Vagrant environments for this user
$ vagrant halt stops the vagrant machine
$ vagrant help shows the help for a subcommand
$ vagrant init initializes a new Vagrant environment by creating a Vagrantfile
$ vagrant login log in to HashiCorp's Atlas
$ vagrant package packages a running vagrant environment into a box
$ vagrant plugin manages plugins: install, uninstall, update, etc.
$ vagrant port displays information about guest port mappings
$ vagrant powershell connects to machine via powershell remoting
$ vagrant provision provisions the vagrant machine
$ vagrant push deploys code in this environment to a configured destination
$ vagrant rdp connects to machine via RDP
$ vagrant reload restarts vagrant machine, loads new Vagrantfile configuration
$ vagrant resume resume a suspended vagrant machine
$ vagrant share share your Vagrant environment with anyone in the world
$ vagrant snapshot manages snapshots: saving, restoring, etc.
$ vagrant ssh connects to machine via SSH
$ vagrant ssh-config outputs OpenSSH valid configuration to connect to the machine
$ vagrant status outputs status of the vagrant machine
$ vagrant suspend suspends the machine
$ vagrant up starts and provisions the vagrant environment
$ vagrant vbguest
$ vagrant version prints current and latest Vagrant version
Thank you for sharing wonderful information with us to get some idea about that content. check it once through Devops Online Training
ReplyDeleteThank you for your guide to with upgrade information about AWS keep update at
ReplyDeleteAWS Online Course