
1 Prick the architecture or service for you
1.1 MongoDB Atlas
 MongoDB Atlas is a managed service that provide you MongoDB on AWS. Using MongoDB Atlas will free you on the setup, operation and maintains with your own MongoDB instance.
So it is important to take a look on MongoDB Atlas before you continue to start setting up MongoDB on your own.
For most of the shops, one of the biggest difficulty on using MongoDB Atlas is getting approval from the security team. MongoDB Atlas is not owned by AWS, therefore, to connect to MongoDB Atlas, you need to set up a VPC peering with them, in most of the time, getting approval on this type of setup is difficult.

In case you decide to use MongoDB Atlas, you can skip this post and move on. But if you decide to build your own MongoDB, MongoDB recommends one out two architecture in the following:

1.2 Architecture one - 1 primary and 2 secondary server
With this architecture, you need all three EC2 instances have same size and set up. 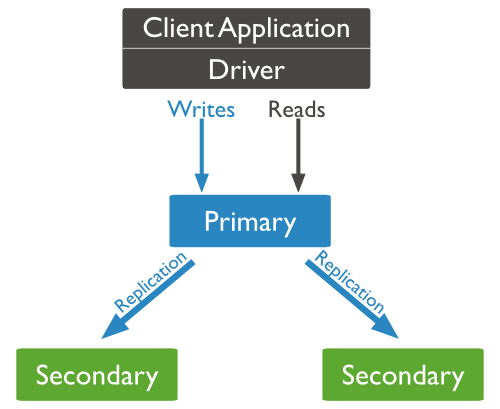
You need to use at least two AWS availability zones to host this configuration
When the primary server fails, one of the secondary will be elected and becomes primary server.
1.3 Architecture two - 1 master, 1 secondary and 1 arbiter server
With this architecture, the primary and secondary servers need to have same size and set up. The Arbitter can be a small EC2 instance, such as T2-micro.
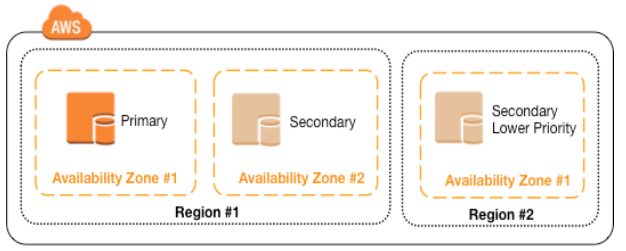
Each server should reside on separated AWS availability zones.
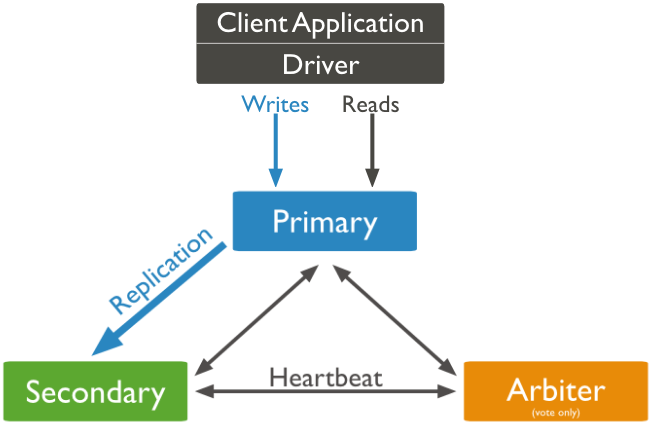
Based on the AWS white paper, we need to use 3 availability zones. The primary mongoDB on the first zone, secondary on the 2nd zone and the arbiter on the 3rd zone.
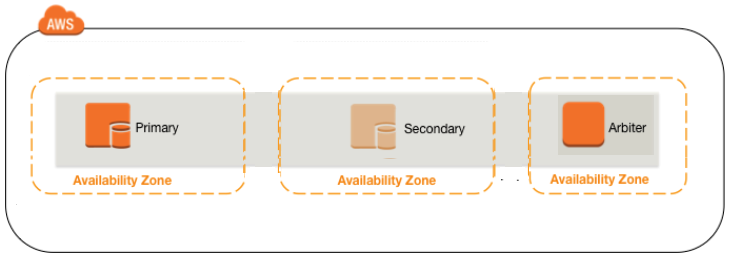
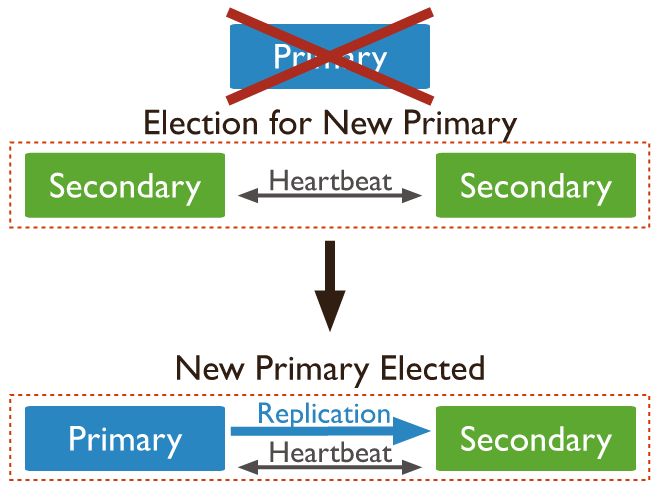
When the primary fails, the only surviving secondary will become the primary.

The benefits of this setup is saving money on using a small EC2 instance for the arbiter, but there is a risk of losing data if your 2nd Primary fails and can not repair,
2 AWS and MongoDB recommendations
2.1 OS and MongoDB versions
MongoDB recommends the following when deploy on AWS:
-
Use Amazon Linux as the EC2 instance
-
Use repository dedicated to Amazon Linux (i.e. https://repo.mongodb.org/yum/amazon/2013.03/mongodb-org/3.4/x86_64/RPMS/)
-
Use version 3.2 or above:
Starting in MongoDB 3.0, the WiredTiger storage engine is available in the 64-bit builds.
The WiredTiger storage engine is the default storage engine starting in MongoDB 3.2.
WiredTiger uses document-level concurrency control for write operations. As a result, multiple clients can modify different documents of a collection at the same time.
Use Amazon Linux as the EC2 instance
Use repository dedicated to Amazon Linux (i.e. https://repo.mongodb.org/yum/amazon/2013.03/mongodb-org/3.4/x86_64/RPMS/)
Use version 3.2 or above:
2.2 Storage configuration
For production environment, MongDB recommends the following:
-
Use XFS file system
-
Use EBS-optimized EC2 instances
-
Use Provisioned IOPS (PIOPS) EBS volumes
-
Separate volumes for data files, the journal, and the log file system for the best performance, the IOPS requirements for the EBS volumes should be:
-
data (1000 IOPS)
-
journal (250 IOPS)
-
log (100 IOPS)
Use XFS file system
Use EBS-optimized EC2 instances
Use Provisioned IOPS (PIOPS) EBS volumes
Separate volumes for data files, the journal, and the log file system for the best performance, the IOPS requirements for the EBS volumes should be:
- data (1000 IOPS)
- journal (250 IOPS)
- log (100 IOPS)
2.3 OS requirement for Amazon Linux
2.3.1 Ulimit
By default MongoDB init script define the ulimits needed for MongoDB, however, there is a bug and the nproc is not set. Create a file call /etc/security/limits.d/90-mongodb.conf to modify the ulimit:
mogod soft nproc 64000
mogod soft nproc 64000
|
2.3.2 Kernel setup for “read ahead”
The default read ahead settings on EC2 are not optimized for MongoDB. We should adjust the settings to read approximately 32 blocks (or 16 KB) of data.
Create a file called /etc/udev/rules.d/85-ebs.rules with the following:
ACTION=="add", KERNEL=="xvdf", ATTR{bdi/read_ahead_kb}="16"'
Note: we assume the xvdf is the device used for MongoDB
ACTION=="add", KERNEL=="xvdf", ATTR{bdi/read_ahead_kb}="16"'
|
2.3.3 Disable Transparent Huge Pages (THP) on the Kernel
Transparent Huge Pages (THP) is a Linux memory management system that reduces the overhead of Translation Lookaside Buffer (TLB) lookups on machines with large amounts of memory by using larger memory pages.
By defatul THP is enabled on Amazon Linux and MongoDB database will perform poorly, therefore MongoDB recommends disabling THP. Following is the steps:
-
Create the following file at /etc/init.d/disable-transparent-hugepages:
#!/bin/sh
### BEGIN INIT INFO
# Provides: disable-transparent-hugepages
# Required-Start: $local_fs
# Required-Stop:
# X-Start-Before: mongod mongodb-mms-automation-agent
# Default-Start: 2 3 4 5
# Default-Stop: 0 1 6
# Short-Description: Disable Linux transparent huge pages
# Description: Disable Linux transparent huge pages, to improve
# database performance.
### END INIT INFO
case $1 in
start)
if [ -d /sys/kernel/mm/transparent_hugepage ]; then
thp_path=/sys/kernel/mm/transparent_hugepage
elif [ -d /sys/kernel/mm/redhat_transparent_hugepage ]; then
thp_path=/sys/kernel/mm/redhat_transparent_hugepage
else
return 0
fi
echo 'never' > ${thp_path}/enabled
echo 'never' > ${thp_path}/defrag
unset thp_path
;;
esac
-
Make the init script executable.
$ sudo chmod 755 /etc/init.d/disable-transparent-hugepages
-
Enable the init script on boot
$ sudo chkconfig --add disable-transparent-hugepages
Create the following file at /etc/init.d/disable-transparent-hugepages:
#!/bin/sh
### BEGIN INIT INFO
# Provides: disable-transparent-hugepages
# Required-Start: $local_fs
# Required-Stop:
# X-Start-Before: mongod mongodb-mms-automation-agent
# Default-Start: 2 3 4 5
# Default-Stop: 0 1 6
# Short-Description: Disable Linux transparent huge pages
# Description: Disable Linux transparent huge pages, to improve
# database performance.
### END INIT INFO
case $1 in
start)
if [ -d /sys/kernel/mm/transparent_hugepage ]; then
thp_path=/sys/kernel/mm/transparent_hugepage
elif [ -d /sys/kernel/mm/redhat_transparent_hugepage ]; then
thp_path=/sys/kernel/mm/redhat_transparent_hugepage
else
return 0
fi
echo 'never' > ${thp_path}/enabled
echo 'never' > ${thp_path}/defrag
unset thp_path
;;
esac
|
Make the init script executable.
$ sudo chmod 755 /etc/init.d/disable-transparent-hugepages
|
Enable the init script on boot
$ sudo chkconfig --add disable-transparent-hugepages
|
3 Deploy a MongoDB replica set
In this example, I provide instruction on creating a MongoDB replica set on three hosts,
For architecture one, there are 1 master and 2 secondary nodes. The host name are
-
Primary node - mongodb1
-
Secondary node - mongodb2
-
Aribitor node - mongodb3
For architecture two, there are 1 master, 1 secondary and 1 arbiter node. The host name are
-
Primary node - mongodb1
-
Secondary node - mongodb2
-
Aribitor node - mongo-aribitor
Primary node - mongodb1
Secondary node - mongodb2
Aribitor node - mongodb3
Primary node - mongodb1
Secondary node - mongodb2
Aribitor node - mongo-aribitor
3.1 Install MongoDB software on all 3 hosts
-
Edit /etc/yum.repos.d/mongodb.repo with the following
[mongodb]
name=MongoDB Repository
baseurl=https://repo.mongodb.org/yum/amazon/2013.03/mongodb-org/3.2/x86_64/RPMS/
gpgcheck=0
enabled=1
-
Install the mongodb software
$ sudo yum install -y mongodb-org
-
Verify that MongoDB has started successfully
You can verify that the mongod process has started successfully by checking the contents of the log file at /var/log/mongodb/mongod.log, you should find a line reading
[initandlisten] waiting for connections on port <port>
where <port> is the port configured in /etc/mongod.conf, 27017 by default.
-
Enable mongod process on boot
$ sudo chkconfig mongod on
Edit /etc/yum.repos.d/mongodb.repo with the following
[mongodb]
name=MongoDB Repository
baseurl=https://repo.mongodb.org/yum/amazon/2013.03/mongodb-org/3.2/x86_64/RPMS/
gpgcheck=0
enabled=1
|
Install the mongodb software
$ sudo yum install -y mongodb-org
|
Verify that MongoDB has started successfully
[initandlisten] waiting for connections on port <port>
|
Enable mongod process on boot
$ sudo chkconfig mongod on
|
3.2 Modify mongo configuration on all MongoDB nodes
First, you need to determine the name of the replication set, in this example, we use “rs0”
-
For each mongo db node, edit /etc/mongod.conf
-
Comment out “bindIP”
-
Add the replication session
…
# network interfaces
net:
#bindIp: 127.0.0.1 - Important to comment this line
port: 27017
….
….
replication:
replSetName: rs0
….
-
After changing the mongodb configuration, restart mongod
# service restart mongod
For each mongo db node, edit /etc/mongod.conf
- Comment out “bindIP”
- Add the replication session
…
# network interfaces
net: #bindIp: 127.0.0.1 - Important to comment this line port: 27017
….
….
replication:
replSetName: rs0
….
|
After changing the mongodb configuration, restart mongod
# service restart mongod
|
3.3 Make sure all nodes can communicate with each other on the port 27017
You need to make sure all nodes has mongod running and listen to port 27017 first. Then you should able to telnet to each host on port 27017 to verify all ports are opened for communication.
The telnet command
$ telnet <mongo host> 27017
$ telnet <mongo host> 27017
|
3.4 Restore DB if needed
If you already have a single instance mongodb server running on development environment, and like to migrate it to this new replica set configuration using the three nodes, take a backup of the mongodb using mongodump, and restore it on the primary database instance using mongorestore command.
$ mongorestore --dbpath /var/lib/mongo --db ${db_destination} --drop dump/${db_source}
After the restore, if the file permissions under /var/lib/mongo directory are different, change it accordingly as shown below.
$ cd /var/lib/gmongo
$ sudo chown mongod:mongod *
$ sudo service mongod start
$ mongorestore --dbpath /var/lib/mongo --db ${db_destination} --drop dump/${db_source}
|
$ cd /var/lib/gmongo
$ sudo chown mongod:mongod * $ sudo service mongod start |
3.5 Initialize the replication set from primary node
on the primary mongodb node, run rs.initiate() under mongo shell
# mongo
> rs.initiate()
MongoDB shell version: 3.2.11
connecting to: test
{
"info2" : "no configuration specified. Using a default configuration for the set",
"me" : "mongodb1:27017",
"ok" : 1
}
Or you can run mongo --eval "rs.initiate();" to have same result
Check the replication status with “rs.status()” and “rs.config()”
> rs.config();
{
"_id" : "prodRepl",
"version" : 1,
"members" : [
{
"_id" : 0,
"host" : "mongodb1:27017"
}
]
}
You can also check the replication status from the log file from /var/log/mongo/mongod.log
# mongo
> rs.initiate()
MongoDB shell version: 3.2.11
connecting to: test
{
"info2" : "no configuration specified. Using a default configuration for the set",
"me" : "mongodb1:27017",
"ok" : 1
}
|
> rs.config();
{ "_id" : "prodRepl", "version" : 1, "members" : [ { "_id" : 0, "host" : "mongodb1:27017" } ] } |
3.6 Add secondary node
On mongodb master node, add the 2nd node with rs.add command.
You can check if you are on the master node by running db.isMaster()
rs0:PRIMARY> rs.isMaster()
{
"hosts" : [
"mongodb1:27017"
],
"setName" : "rs0",
"setVersion" : 1,
"ismaster" : true,
"secondary" : false,
"primary" : "mongodb1:27017",
"me" : "mongodb1:27017",
"electionId" : ObjectId("7fffffff0000000000000001"),
"maxBsonObjectSize" : 16777216,
"maxMessageSizeBytes" : 48000000,
"maxWriteBatchSize" : 1000,
"localTime" : ISODate("2016-12-15T23:29:13.323Z"),
"maxWireVersion" : 4,
"minWireVersion" : 0,
"ok" : 1
}
rs0:PRIMARY> rs.add("mongodb2:27017")
{ "ok" : 1 }
rs0:PRIMARY> rs.status
function () {
return db._adminCommand("replSetGetStatus");
}
Check status
rs0:PRIMARY> rs.status()
{
"set" : "rs0",
"date" : ISODate("2016-12-15T23:29:56.777Z"),
"myState" : 1,
"term" : NumberLong(1),
"heartbeatIntervalMillis" : NumberLong(2000),
"members" : [
{
"_id" : 0,
"name" : "mongodb1:27017",
"health" : 1,
"state" : 1,
"stateStr" : "PRIMARY",
"uptime" : 791,
"optime" : {
"ts" : Timestamp(1481844588, 1),
"t" : NumberLong(1)
},
"optimeDate" : ISODate("2016-12-15T23:29:48Z"),
"electionTime" : Timestamp(1481844063, 2),
"electionDate" : ISODate("2016-12-15T23:21:03Z"),
"configVersion" : 2,
"self" : true
},
{
"_id" : 1,
"name" : "mongodb2:27017",
"health" : 1,
"state" : 2,
"stateStr" : "SECONDARY",
"uptime" : 8,
"optime" : {
"ts" : Timestamp(1481844588, 1),
"t" : NumberLong(1)
},
"optimeDate" : ISODate("2016-12-15T23:29:48Z"),
"lastHeartbeat" : ISODate("2016-12-15T23:29:56.350Z"),
"lastHeartbeatRecv" : ISODate("2016-12-15T23:29:54.362Z"),
"pingMs" : NumberLong(0),
"configVersion" : 2
}
],
"ok" : 1
}
If your database is not empty, it will take a while to perform the initial cloning of the database from mongodb1 to mongodb2. You might see something like the following:
{
"set" : "prodRepl",
"date" : ISODate("2014-02-22T21:27:53Z"),
"myState" : 1,
"members" : [
{
"_id" : 0,
….
...
},
{
"_id" : 1,
"name" : "mongodb2:27017",
….
"stateStr" : "STARTUP2",
….
….
"lastHeartbeatMessage" : "initial sync cloning db: mongoprod"
}
],
"ok" : 1
}
Note: If you login to mongodb2 node, and execute the above command, you’ll see the exact same message, as both the nodes are now part of the same replica set.
If you are using two secondary nodes, all you need to do is add the three node (say it is call mongdb3) by running
rs0:PRIMARY> rs.isMaster()
{
"hosts" : [
"mongodb1:27017"
],
"setName" : "rs0",
"setVersion" : 1,
"ismaster" : true,
"secondary" : false,
"primary" : "mongodb1:27017",
"me" : "mongodb1:27017",
"electionId" : ObjectId("7fffffff0000000000000001"),
"maxBsonObjectSize" : 16777216,
"maxMessageSizeBytes" : 48000000,
"maxWriteBatchSize" : 1000,
"localTime" : ISODate("2016-12-15T23:29:13.323Z"),
"maxWireVersion" : 4,
"minWireVersion" : 0,
"ok" : 1
}
rs0:PRIMARY> rs.add("mongodb2:27017")
{ "ok" : 1 }
rs0:PRIMARY> rs.status
function () {
return db._adminCommand("replSetGetStatus");
}
|
rs0:PRIMARY> rs.status()
{
"set" : "rs0",
"date" : ISODate("2016-12-15T23:29:56.777Z"),
"myState" : 1,
"term" : NumberLong(1),
"heartbeatIntervalMillis" : NumberLong(2000),
"members" : [
{
"_id" : 0,
"name" : "mongodb1:27017",
"health" : 1,
"state" : 1,
"stateStr" : "PRIMARY",
"uptime" : 791,
"optime" : {
"ts" : Timestamp(1481844588, 1),
"t" : NumberLong(1)
},
"optimeDate" : ISODate("2016-12-15T23:29:48Z"),
"electionTime" : Timestamp(1481844063, 2),
"electionDate" : ISODate("2016-12-15T23:21:03Z"),
"configVersion" : 2,
"self" : true
},
{
"_id" : 1,
"name" : "mongodb2:27017",
"health" : 1,
"state" : 2,
"stateStr" : "SECONDARY",
"uptime" : 8,
"optime" : {
"ts" : Timestamp(1481844588, 1),
"t" : NumberLong(1)
},
"optimeDate" : ISODate("2016-12-15T23:29:48Z"),
"lastHeartbeat" : ISODate("2016-12-15T23:29:56.350Z"),
"lastHeartbeatRecv" : ISODate("2016-12-15T23:29:54.362Z"),
"pingMs" : NumberLong(0),
"configVersion" : 2
}
],
"ok" : 1
}
|
If your database is not empty, it will take a while to perform the initial cloning of the database from mongodb1 to mongodb2. You might see something like the following:
{
"set" : "prodRepl", "date" : ISODate("2014-02-22T21:27:53Z"), "myState" : 1, "members" : [ { "_id" : 0, ….
...
}, { "_id" : 1, "name" : "mongodb2:27017", …. "stateStr" : "STARTUP2", ….
….
"lastHeartbeatMessage" : "initial sync cloning db: mongoprod" } ], "ok" : 1 } |
3.7 Add the last secondary node or the arbiter node
3.7.1 Add 2nd secondary node
If you are using two secondary nodes, all you need to do is add the three node (say it is call mongdb3) by running
rs0:PRIMARY> rs.add("mongodb3:27017")
rs0:PRIMARY> rs.add("mongodb3:27017")
|
3.7.2 Add aribiter node
On the master node, run the
rs.addArb("mongo-arbiter:27017")
Now if you view the configuration using rs.config command, you’ll see all three nodes.
rs0:PRIMARY> rs.status()
{
"set" : "rs0",
"date" : ISODate("2016-12-15T23:34:10.759Z"),
"myState" : 1,
"term" : NumberLong(1),
"heartbeatIntervalMillis" : NumberLong(2000),
"members" : [
{
"_id" : 0,
"name" : "mongodb1:27017",
"health" : 1,
"state" : 1,
"stateStr" : "PRIMARY",
"uptime" : 1045,
"optime" : {
"ts" : Timestamp(1481844835, 1),
"t" : NumberLong(1)
},
"optimeDate" : ISODate("2016-12-15T23:33:55Z"),
"electionTime" : Timestamp(1481844063, 2),
"electionDate" : ISODate("2016-12-15T23:21:03Z"),
"configVersion" : 3,
"self" : true
},
{
"_id" : 1,
"name" : "mongodb2:27017",
"health" : 1,
"state" : 2,
"stateStr" : "SECONDARY",
"uptime" : 262,
"optime" : {
"ts" : Timestamp(1481844835, 1),
"t" : NumberLong(1)
},
"optimeDate" : ISODate("2016-12-15T23:33:55Z"),
"lastHeartbeat" : ISODate("2016-12-15T23:34:09.677Z"),
"lastHeartbeatRecv" : ISODate("2016-12-15T23:34:10.674Z"),
"pingMs" : NumberLong(0),
"syncingTo" : "mongodb1:27017",
"configVersion" : 3
},
{
"_id" : 2,
"name" : "mongo-arbiter:27017",
"health" : 1,
"state" : 7,
"stateStr" : "ARBITER",
"uptime" : 15,
"lastHeartbeat" : ISODate("2016-12-15T23:34:09.677Z"),
"lastHeartbeatRecv" : ISODate("2016-12-15T23:34:10.704Z"),
"pingMs" : NumberLong(0),
"configVersion" : 3
}
],
"ok" : 1
}
rs.addArb("mongo-arbiter:27017")
|
rs0:PRIMARY> rs.status()
{
"set" : "rs0",
"date" : ISODate("2016-12-15T23:34:10.759Z"),
"myState" : 1,
"term" : NumberLong(1),
"heartbeatIntervalMillis" : NumberLong(2000),
"members" : [
{
"_id" : 0,
"name" : "mongodb1:27017",
"health" : 1,
"state" : 1,
"stateStr" : "PRIMARY",
"uptime" : 1045,
"optime" : {
"ts" : Timestamp(1481844835, 1),
"t" : NumberLong(1)
},
"optimeDate" : ISODate("2016-12-15T23:33:55Z"),
"electionTime" : Timestamp(1481844063, 2),
"electionDate" : ISODate("2016-12-15T23:21:03Z"),
"configVersion" : 3,
"self" : true
},
{
"_id" : 1,
"name" : "mongodb2:27017",
"health" : 1,
"state" : 2,
"stateStr" : "SECONDARY",
"uptime" : 262,
"optime" : {
"ts" : Timestamp(1481844835, 1),
"t" : NumberLong(1)
},
"optimeDate" : ISODate("2016-12-15T23:33:55Z"),
"lastHeartbeat" : ISODate("2016-12-15T23:34:09.677Z"),
"lastHeartbeatRecv" : ISODate("2016-12-15T23:34:10.674Z"),
"pingMs" : NumberLong(0),
"syncingTo" : "mongodb1:27017",
"configVersion" : 3
},
{
"_id" : 2,
"name" : "mongo-arbiter:27017",
"health" : 1,
"state" : 7,
"stateStr" : "ARBITER",
"uptime" : 15,
"lastHeartbeat" : ISODate("2016-12-15T23:34:09.677Z"),
"lastHeartbeatRecv" : ISODate("2016-12-15T23:34:10.704Z"),
"pingMs" : NumberLong(0),
"configVersion" : 3
}
],
"ok" : 1
}
|
4 Enable MongoDB Access Control and role based authentication
Enabling ACL is kind of tricky on MongoDB. By default, access authentication is disabled on MongoDB and there is no default administrator ID. In addition, keyfile or SSL is needed if authentication is enabled in a replica set environment.
In following, we are going to enable a MongoDB replica set with authentication:
-
On each MongoDB server, create an internal key file
$ sudo echo your_secure_key > /var/lib/mongo/internal_key
$ sudo chown mongod:mongod /var/lib/mongo/internal_key
$ sudo chmod 600 /var/lib/mongo/internal_key
Note: special character, such as @, is not allowed in the internal key file.
-
Edit /etc/mongod.conf and add the following:
security:
keyFile : /var/lib/mongo/internal_key
Note: Enabling security.keyFile option also enables authorization: enabled option.
-
Edit /etc/mongod.conf and add the following:
security:
keyFile : /var/lib/mongo/internal_key
-
Login to the MongoDB primary host
-
Connect to “admin” database with MongoDB
/user/bin/mongo admin
-
Create application database and assign a DB owner user ID
> use mydb
> db.createUser( { user: "myDBAdmin", pwd: "mypassword", roles: [ "dbOwner" ]} )
> exit
Note: the above commands create a database called “mydb”
-
Now, you can login remotely to the database “mydb” with user ID and password.
On each MongoDB server, create an internal key file
$ sudo echo your_secure_key > /var/lib/mongo/internal_key
$ sudo chown mongod:mongod /var/lib/mongo/internal_key
$ sudo chmod 600 /var/lib/mongo/internal_key
|
Edit /etc/mongod.conf and add the following:
security:
keyFile : /var/lib/mongo/internal_key
|
Edit /etc/mongod.conf and add the following:
security:
keyFile : /var/lib/mongo/internal_key
|
Login to the MongoDB primary host
Connect to “admin” database with MongoDB
/user/bin/mongo admin
|
Create application database and assign a DB owner user ID
> use mydb
> db.createUser( { user: "myDBAdmin", pwd: "mypassword", roles: [ "dbOwner" ]} )
> exit
|
Now, you can login remotely to the database “mydb” with user ID and password.
5 Appendix
5.1 Create LVM partition in CloudFormation
For the production environment, we need to ensure we are able to expand the file system for the mongo database without any down time, this could be done by creating an LVM mounted on /var/lib/mongo when we create the EC2 instance.
The following is an example of a CloudFromation template that creates an EC2 instance with a LVM on SSD storage:
…
"MongoDB1" : {
"Type" : "AWS::EC2::Instance",
"Properties" : {
"InstanceType" : { "Ref" : "InstanceType" },
"ImageId" : { "Fn::FindInMap" : [ "RegionMap", { "Ref" : "AWS::Region" }, "AMI" ]},
"KeyName" : { "Ref" : "KeyName" },
"SecurityGroupIds" : [ { "Ref" : "MongoDBServerSecurityGroup" } ],
"SubnetId" : { "Fn::FindInMap" : [ "Subnet", { "Ref" : "OperativeOneEnv" }, "DmzSubnet1id" ] },
"Tags" : [{ "Key" : "Name", "Value" : { "Ref" : "MongoDBTag" } }],
"BlockDeviceMappings": [
{
"DeviceName": "/dev/sda1",
"Ebs": { "VolumeType": "gp2", "VolumeSize": { "Ref" : "DiskSizeRoot" } }
},
{
"DeviceName": "/dev/sdb",
"Ebs": { "VolumeType": "gp2", "VolumeSize": { "Ref" : "DiskSizeOpt" } }
}
],
"UserData" : { "Fn::Base64" : { "Fn::Join" : ["", [
"#!/bin/bash\n",
"## mount /opt on /dev/xvdb as logical volume\n",
"while [ ! -e /dev/xvdb ]; do echo 'waiting for /dev/xvdb to attach' ; sleep 10; done\n",
"dd if=/dev/zero of=/dev/sdh1 bs=512 count=1\n",
"pvcreate /dev/xvdb >> /tmp/install.log 2>&1\n",
"vgcreate vg0 /dev/xvdb >> /tmp/install.log 2>&1\n",
"lvcreate -l 100%vg -n mongo vg0 >> /tmp/install.log 2>&1\n",
"mkfs.ext4 /dev/vg0/mongo >> /tmp/install.log 2>&1\n",
"echo '/dev/vg0/mongo /var/lib/mongo ext4 defaults 0 0' | tee -a /etc/fstab >> /tmp/install.log 2>&1\n",
"mount /opt >> /tmp/install.log 2>&1\n","
]]}}
}
},
|
Wow... It is a complete guide on deploying MongoDB. I found this information very useful. Also you require AWS MongoDB backup. Thanks for sharing
ReplyDeleteThanks for providing your information, Keep Share and update AWS Online Training Hyderabad
ReplyDeleteEnjoyed reading the article above, really explains everything in detail, the article is very interesting and effective. Thank you and good luck for the upcoming articles mongodb online training
ReplyDelete